Tutorial Contents
Introduction
Creating the Active-VHDL Design
Functional
Simulation
Creating
Test Bench
Synthesis and Implementation
Timing
Simulation
Creating Macro for Timing Simulation
Introduction
The purpose of this tutorial is to guide you through a
typical flow of FPGA designing in Active-VHDL. The whole process can be logically divided
into a number of stages, that you are supposed to go through. As the design flow includes
synthesis and implementation stages, you will need to install those external tools:
METAMOR and XACTstep M1. The tutorial is based on the Xilinx_counter sample design,
which is shipped along with Active-VHDL.
Creating
the Active-VHDL Design
- Start Active-VHDL by double-clicking its shortcut icon. From
the Getting Started dialog, select the Create new design check-box, and then
click OK.

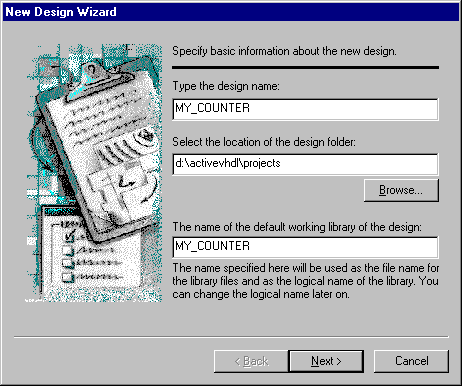
- The New Design Wizard will open its first dialog,
asking you to enter the name and directory path for the new design. Enter MY_COUNTER as
the design name, and then click Next.
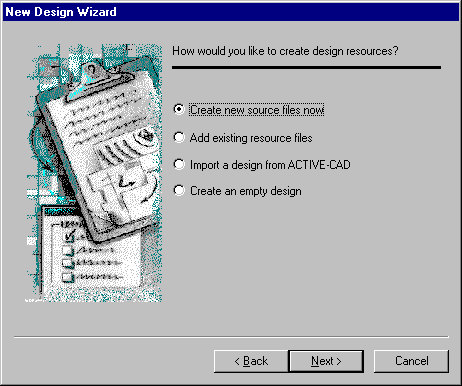
- In the next wizard’s dialog, select the Create new
source files now option, then click Next.
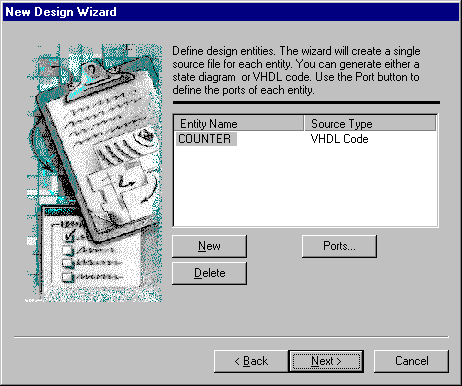
- Now, click New, and then define the COUNTER entity
for the VHDL Code source file as shown in the picture below.
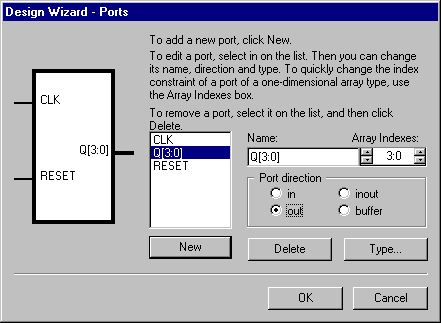
- Define ports of the COUNTER entity by clicking the Ports
button. The Design Wizard - Ports dialog will come up.
- Click New, enter the CLK port name, select the Input
port direction and then click Type to specify the STD_LOGIC port type in the Port
Type dialog box.
- Use the same procedure for the following ports of the
COUNTER entity:
- RESET: in STD_LOGIC
- Q: out STD_LOGIC_VECTOR (3 downto 0)
- Click OK to return to the previous New Design
Wizard dialog, and then click Next.
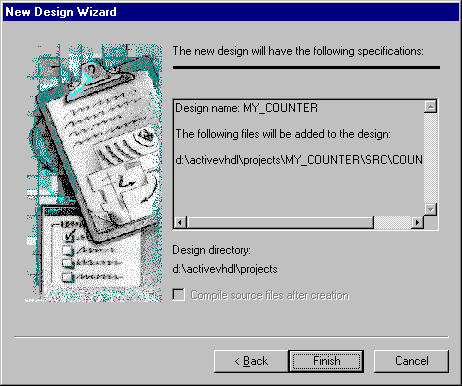
- Check whether the wizard’s final dialog displays the
design properties as defined above. If there are any errors, click Back to return
to the appropriate dialog and update the data.
- Click Finish to create the design with the current
settings.
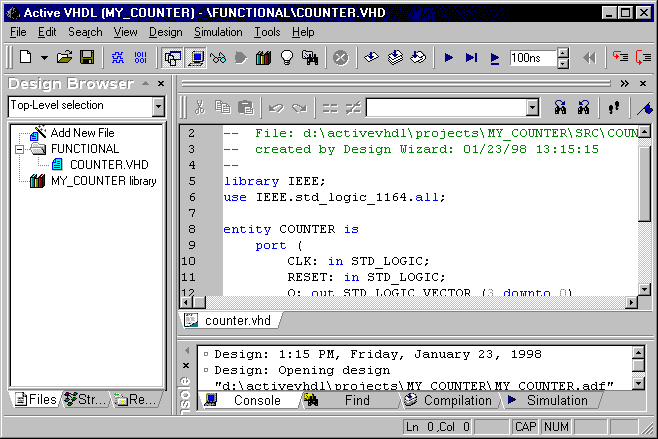
- On the Files tab of the Design Browser, click the
right mouse button, and then choose New Folder from the shortcut menu. Enter
FUNCTIONAL as the new folder’s name.
- Using drag and drop, move the COUNTER.VHD source file to the
new folder.
- Double-click the COUNTER.VHD to open it in HDL Editor.
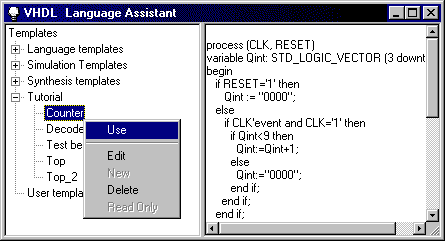
- Place the cursor in the line after the begin
statement in the architecture block. Click the Language Assistant button
 .
.
- In the Language Assistant window, select the Counter
template from the Tutorial template group. Select Use from the shortcut menu
to paste the Counter template to the COUNTER.VHD source file.
- Place the cursor in the line just before the entity
declaration statement in the COUNTER.VHD source. Select the SYNOPSYS template from
the library, packages template group located in the Language templates
group, and then select Use from the shortcut menu. The SYNOPSYS library and
packages declarations are needed to enable the design synthesis with the METAMOR tool.
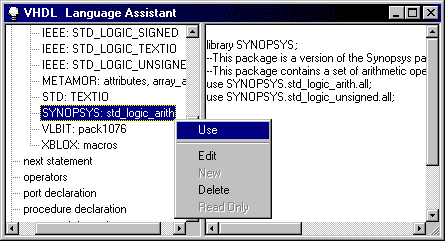
- Close the Language Assistant window.
Functional
Simulation
- Compile the design by clicking the Compile All
toolbar button
 .
.
- Wait for the message reporting successful compilation, then
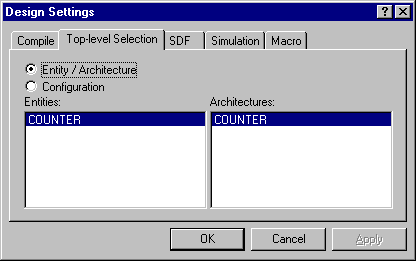
select the Initialize Simulation command from the Simulation menu. Select
COUNTER as the top-level entity, when the Design Settings dialog appears, and then
click OK.
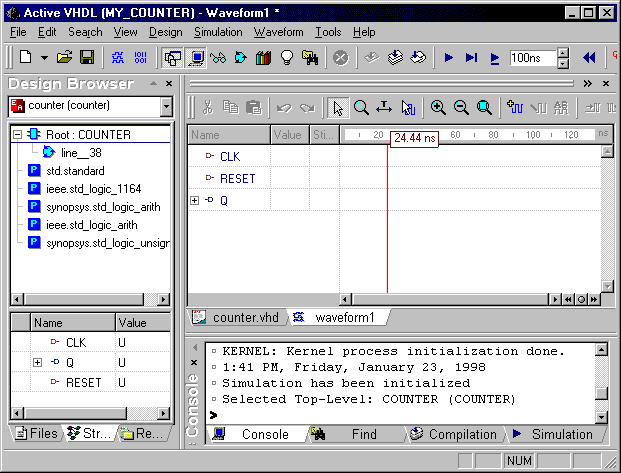
- Click the New Waveform button
 . The new waveform window will open.
- Add all signals of the Root component to the waveform
window by dragging the Root component from the Structure tab of Design
Browser and dropping it over the left pane of the waveform window.
- In the waveform window, select the CLK signal, and then
choose Stimulators from the shortcut menu. This will display the Stimulators
dialog.
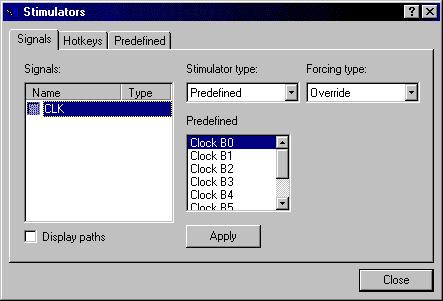
- Select Predefined from the Stimulator type
box, and then select the B0 predefined clock stimulator. Next click Apply to apply
the selected stimulator to the CLK input port.
- Click Close to close the Stimulators dialog.
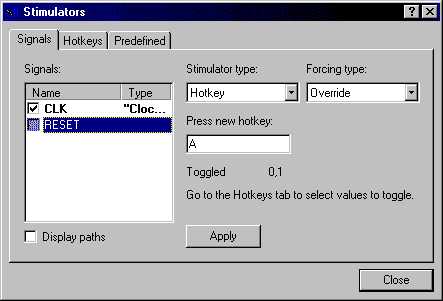
- Repeat step 5. for the RESET signal. Select Hotkey from the Stimulator
type box, and then enter ‘A’ in the Press new hotkey box. Next, click
Apply and close the dialog box.
- Select RESET in the waveform window, press A to set
‘1’ as the RESET initial value, then set the simulation step of 100ns.
- Click the Run for toolbar button to advance the
simulation by the specified time.
- Set ‘0’ RESET value, then set the simulation step
of 2000ns. Click the Run For toolbar button once more.
- Set RESET to ‘1’, and then type run 100ns
in the Console window.
- Set RESET to ‘0’, and then click the Run For
button once again.
- Select End simulation from the Simulation
menu.
The results of the simulation should look as shown in the picture below. Use zooming
functions to adjust the time scale of the waveform window.
- Close the waveform window. Save the waveforms as the
FUNCTIONAL.WFV in the Functional folder. Switch to the Resource tab of the Design
Browser and check that the waveforms you have saved are present in the WAVEFORMS group.
Creating Test
Bench
- Switch to the Files tab in the Design Browser
window.
- In the hierarchy tree, select entity COUNTER from the
COUNTER.VHD file
- Click the right mouse button and select the Generate Test
Bench command from the shortcut menu.
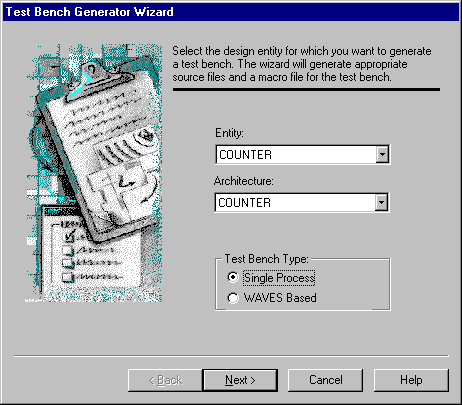
- The Test Bench Generator Wizard will display a series
of windows that will guide you through the process of generating test bench.
In the first window, select the Single Process option and click Next.
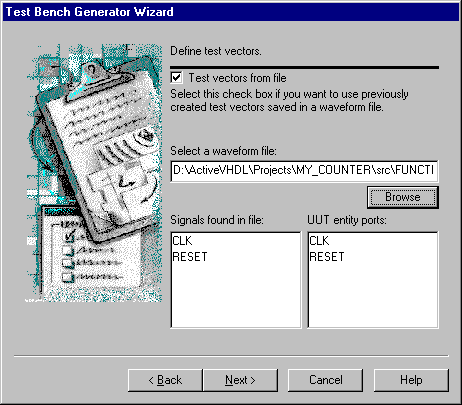
- In the second wizard’s window, select the Test
vectors from file check box, then using the Browse button define the
FUNCTIONAL.WFV file from the Functional folder as the input waveform file.
Click Next to proceed.
- In the next window, delete the default folder name from the
appropriate field. This will cause that the files generated by the wizard will be inserted
into the root source files folder. Then click Next to accept the currently
displayed test bench specification.

- In the last window displayed by the wizard, select the Generate
check box to enable the
timing simulation of the design.
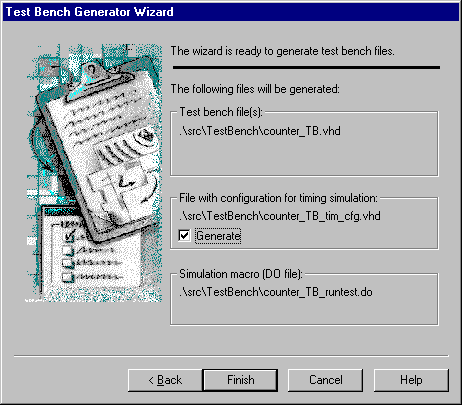
- Click Finish to complete the test bench generation.
The Test Bench Generator Wizard will generate the three following files:
- COUNTER_TB.VHD
- COUNTER_TB_TIM_CFG.VHD
- COUNTER_TB_RUNTEST.DO
- On the Files tab of the Design Browser, click the
right mouse button and choose New Folder from the shortcut menu. Enter TIMING as
the folder’s name. In the same way create the SIMULATE folder.

- Using the drag and drop feature move the
COUNTER_TB_TIM_CFG.VHD file to the TIMING folder, and then the COUNTER_TB_RUNTEST.DO file
to the SIMULATE folder.
- Now, you can run the test simulation using the newly
generated test bench. All you need to do is to execute the COUNTER_TB_RUNTEST.DO macro.
- Wait for the results and then choose the End Simulation option
from the Simulation menu.
Synthesis
and Implementation
After initial verifying of the design by running the
functional simulation, you will have to synthesize the design, what will result in
producing a netlist for physical implementation. As Active-VHDL does not provide any
interface to synthesis tools, you have to run a macro that will call the METAMOR synthesis
tool. The next step is running the XACTstep M1 tool to run Place and Route for the
synthesized netlist. The result of this step is a bitstream file that can be downloaded to
an FPGA device. Apart from this, XACTstep M1 will generate the post-place-and-route
VHDL file for timing simulation and the timing data file in the SDF format.
- Using the procedure described earlier, create the new
IMPLEMENT folder.

- Select Add Files to Design from the Design
menu.
- In the Add Files to Design dialog, select the
IMPLEMENT folder, located in the SRC folder of the Xilinx_counter sample design.
- Select all files from the current folder:
- Select the Make local copy check box, and then click Add
to create copies of the selected files and add them to your design.
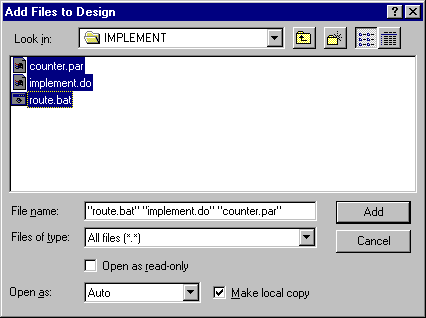
- Using the drag-and-drop feature, move the files to the
IMPLEMENT folder.
- Double-click the IMPLEMENT.DO file in Design Browser to see
the macro contents.
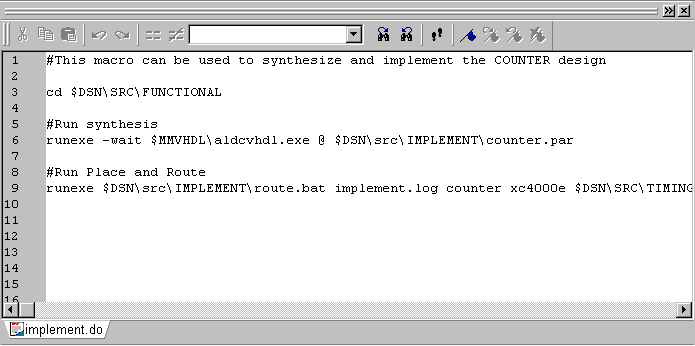
The macro runs two external processes in batch mode:
- the synthesis METAMOR tool with parameters provided by the
COUNTER.PAR parameter file
- the XACTStep M1 Place and Route process executed by
the ROUTE.BAT file
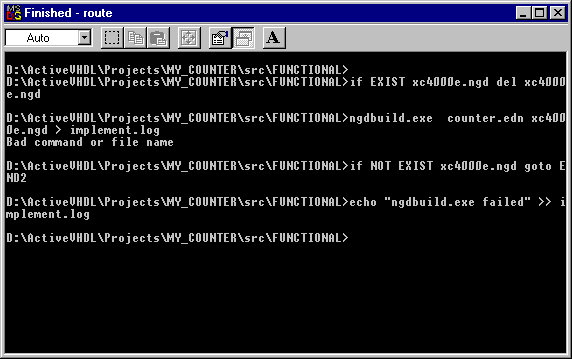
- In the Design Browser, select the IMPLEMENT.DO file from the
IMPLEMENT folder. Click the right mouse button and select Execute from the shortcut
menu. The ROUTE.BAT runs the sequence of procedures making up the Place and Route process.
The progress of its execution is displayed in the MS-DOS Prompt window. Wait until the
ROUTE.BAT is finished, and then close the MS-DOS Prompt window.
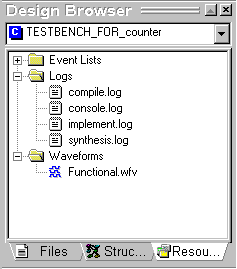
- Switch to the Resource tab of the Design Browser window.
You will see the log files produced by the synthesis and implementation tools:
SYNTHESIS.LOG and IMPLEMENT.LOG.
The Place and Route process should generate two files in the TIMING folder:
COUNTER_TIM.VHD and COUNTER_TIM.SDF.
- Select the TIMING folder, click the right mouse button, and
then select Add Files to Folder from the shortcut menu. From the Add Files to
Design dialog, select the COUNTER_TIM.VHD and COUNTER_TIM.SDF files and click Add.
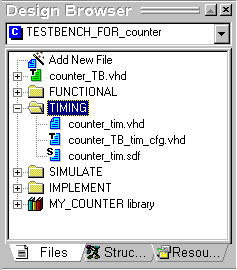
- Make sure that the COUNTER_TIM.VHD file precedes the
Counter_TB_tim_cfg.VHD file on the list of the TIMING folder, as shown above.
Timing
Simulation
- Select the TIMING folder on the Files tab of Design
Browser. Click the right mouse button and select the Compile All in Folder command
from the shortcut menu.
- Select Settings from the Design menu.
- Switch to the Top-level Selection tab, and then
select the TIMING_FOR_COUNTER configuration.

- Switch to the SDF tab, and then select the settings
as shown below:
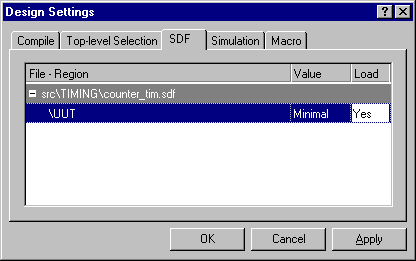
- Click OK to accept the settings and close the dialog.
- Select Initialize Simulation from Simulation.
- Click the New Waveform button to create the new
waveform window.
- Add signals from the Root component on the Structure
tab of the Design Browser window.
- Click the Run button, and then watch the simulation
results.
- Select End Simulation from the Simulation
menu.
Creating Macro for Timing Simulation
The last stage of the design flow is creating macro that
will run the timing simulation of the design.
- From the SIMULATE folder, select the COUNTER_TB_RUNTEST.DO,
and then select Open from the shortcut menu.
- Select Save As from the File menu to save the
file as the RUN_TIMING.DO. Add the file to the SIMULATE folder by selecting the Add
Files to Folder from the shortcut menu.
- Open the RUN_TIMING.DO file and edit it as shown below:
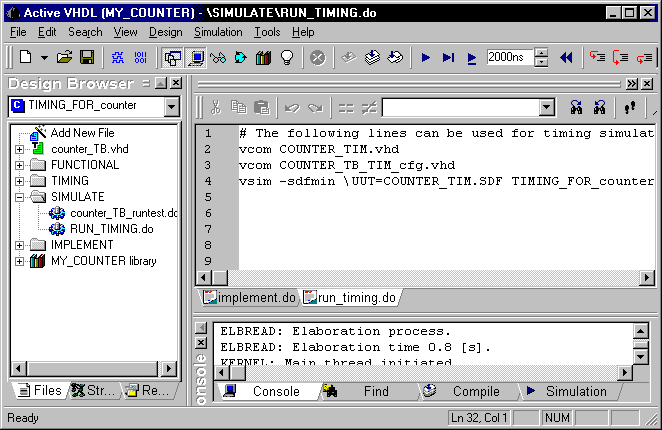
Save the macro for future use.