Test Bench
Tutorial - Contents
Introduction
Creating New Design
Functional Simulation
Generating Test Bench
Running Test Bench Macro
Replacing Design Architecture
Timing Simulation
Introduction
The purpose of this tutorial is to
acquaint you with methods of automatic generation of test
benches.
A test bench is a design entity (test bench entity) which serves
as a host environment for another design entity being tested. The
tested entity called Unit Under Test (UUT) is instantiated in the
test bench architecture. The test bench architecture provides
signals which are mapped to ports of the UUT entity.
Depending on its smartness, a test bench can either drive input
ports of the UTT entity only or simultaneously drive the inputs
and compare the output response with a previously saved pattern.
Test vectors used to stimulate the UUT entity can be furnished in
an external file or encoded immediately in the test bench
architecture.
Once the user has generated a test bench and prepared
specification of test vectors, the test bench can be used many
times to perform automatic verification of successive revisions
of a VHDL design.
Active-VHDL provides Test Bench Wizard - a tool designed for
automatic generation of test benches.
Creating New Design
In the tutorial, you will create a
simple design. To save time, you will reuse VHDL code from the Synchronous_counter
sample design, shipped with Active-VHDL.
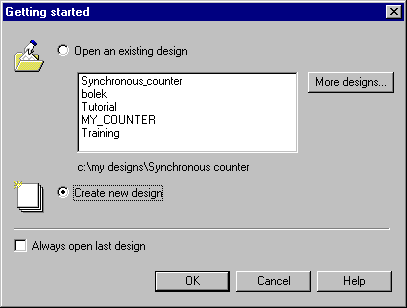
- Start Active-VHDL. If the Getting
Started dialog opens, click Cancel.
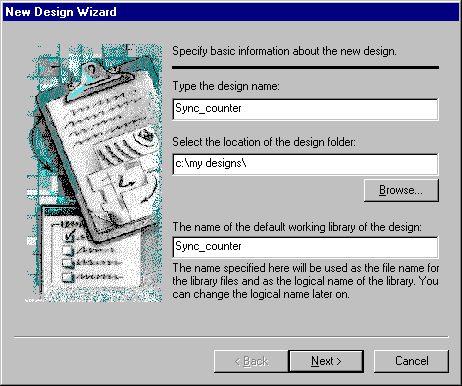
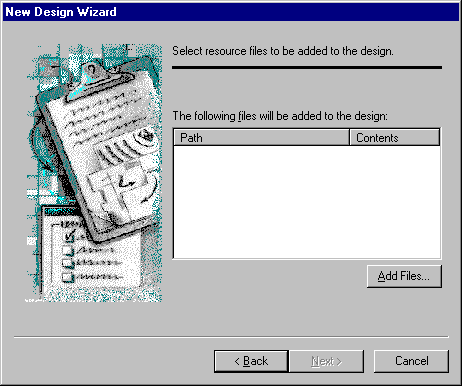
- Choose New Design from
the File menu. The New Design Wizard will
open.
- Enter Sync_counter as
the design name and click Next.
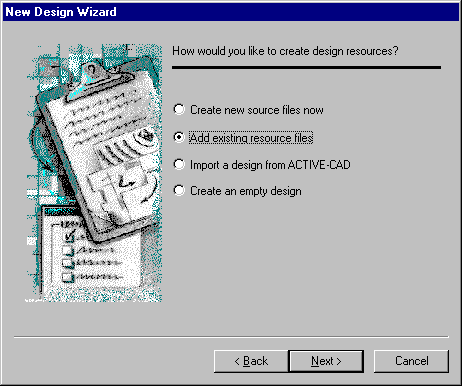
- You will use an existing VHDL
source file from the Synchronous_counter sample
design. Select the Add existing resource files
option and click Next.
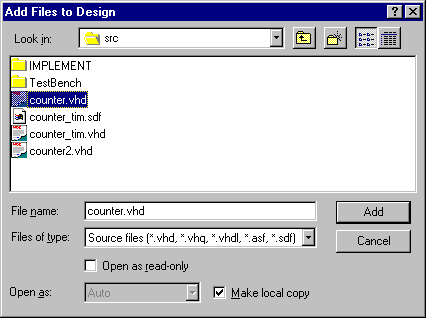
- Click the Add files
button to open the Add Files to Design dialog.
- In the dialog, select the counter.vhd
source file from the src folder of the Synchronous_counter
sample design directory.
Select the Make local copy check box, and then
click Add to copy the counter.vhd file to
your design directory.
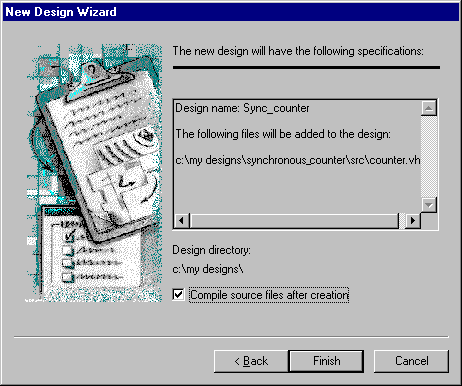
Then click Next to display the last wizard dialog.
- The next wizard dialog shows
a summarized design specification so that you can view it
before the design will be created.
Select the Compile source files after creation
check box, and then click Finish.
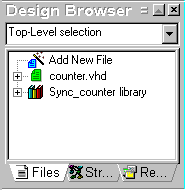
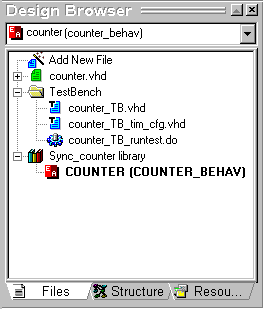
The design will be created and the
counter.vhd file will be compiled. After this operation,
the Design Browser window should look as shown below:
Functional Simulation
Functional simulation is a first
step of the design verification process. Usually, the user at
this stage defines test vectors required to verify operation of
the design. Before the initialization of simulation, you must
select the top-level design unit. The compiled design resides in
the Sync_counter library, which is the default working
library of the design.
- In Design Browser, click the
small + icon to the left of the Sync_counter
library icon to view its contents.
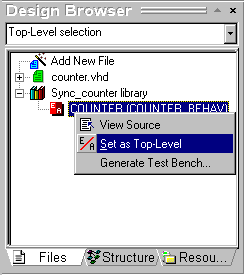
- Click the COUNTER
(COUNTER_BEHAV) design entity with the right mouse
button, and then select the Set as Top-level
option from the shortcut menu.
- Choose the Initialize
Simulation command from the Simulation menu.
The simulator will start elaboration of the design. The
successful initialization will be reported in the Console
window with message "Simulation has been
initialized".
Design Browser will automatically switch to the Structure
tab. You can view the structure of the
elaborated design. Click the Root to display the
components in the bottom part of the Design Structure
window.
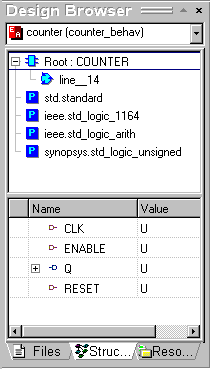
The design is ready for
simulation.
Now, you will have to create pattern test vectors. Saved in a
file, test vectors provide both a stimulus for design inputs and
pattern output response which can be compared with the design
output.
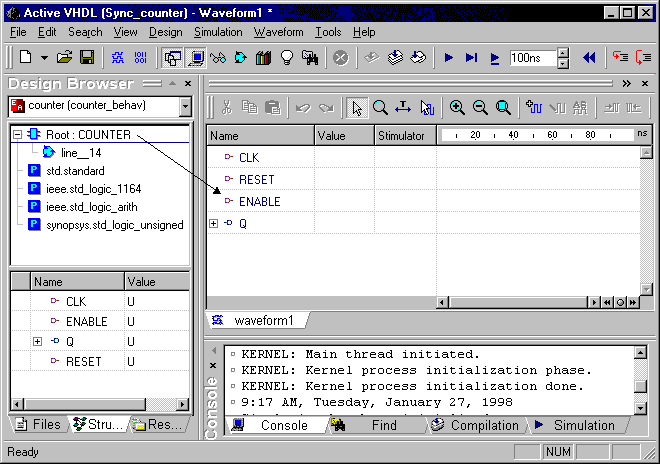
- Open an empty Waveform
Editor window by clicking the
 toolbar
button.
toolbar
button.
Now you have to add ports of the entity COUNTER. To do
so, drag the structural component Root: COUNTER
from the Structure tab and drop it over the Waveform
Editor window.
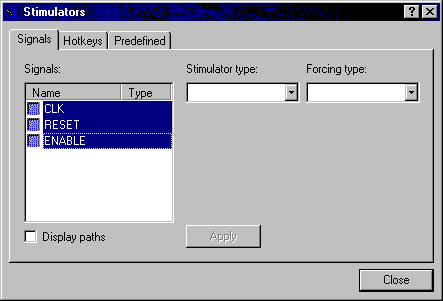
- In the Waveform window,
select the three input signals: CLK, RESET and ENABLE,
and click the right mouse button.
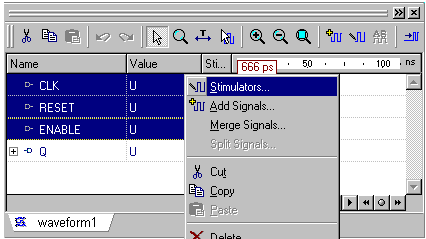
Then, from the shortcut menu,
select Stimulators command. The Stimulators dialog
box will open:
- Select the CLK signal and
define its stimulator by selecting the dialog options as
shown below:
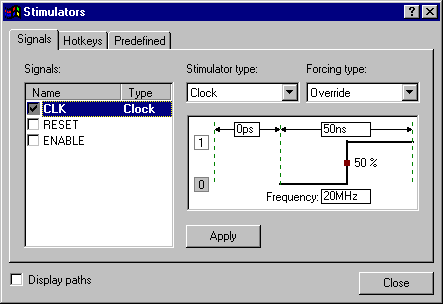
Such settings define a rectangular
pulse wave of the 20 MHz frequency and 50% duty cycle, starting
from the LOW value. It will be used for stimulating the CLK input
of the synchronous counter.
- Click Apply to assign
the defined stimulator to the CLK input port.
- Now, select the RESET signal
and select the dialog options as shown in the figure
below:

The RESET signal serves as the
asynchronous reset input of the counter. You have assigned the
hot-key stimulator to it. Each time you press the X key during
simulation, the signal value will be toggled between 0 and 1
values.
- Click Apply.
- Now, select the ENABLE
signal. Select Formula as the stimulator type and
enter the following formula in the Enter formula
box:
0 0, 1 135 ns, 0 520 ns, 1 580 ns, 0 980 ns, 1 1015 ns

Such settings define a formula
type stimulator. The stimulator drives the clock enable input of
the counter with a wave defined by a sequence of (value,time)
pairs.
- Click Apply, and then Close.
With so defined stimulators, the design is ready for
simulation.
- Press X to set the value of
the RESET signal to ‘0’.
- Set 30ns in the Time to
Run box, and then click the Run For toolbar
button
 .
.
- With the RESET signal set to
‘1’, set 50 ns in the Time to Run box,
and then click the Run For toolbar button.
- Press X to set the value of
the RESET signal to ‘0’.
- Set 500ns in the Time Step
box, and then click the Run For button twice to
advance the stimulation time to 1080 ns.
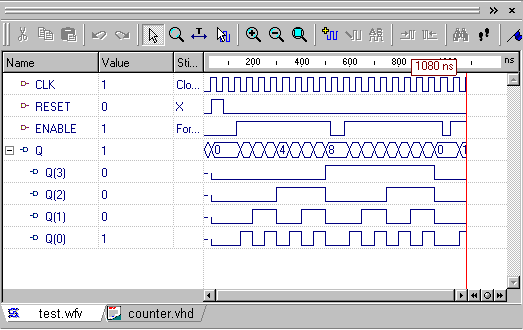
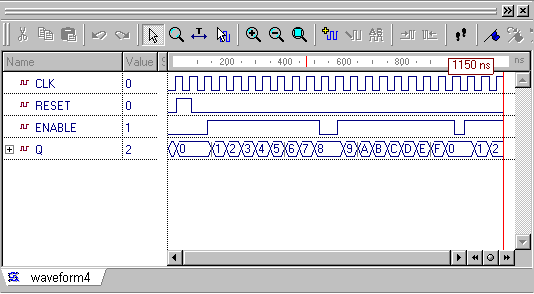
- The obtained waveforms will
be used to generate a test bench. Before doing so, you
should end the simulation and save test vectors to a
file.
- Choose End Simulation
from the Simulation menu.
- Choose Save As from
the File menu. In the Save As dialog
enter test as the waveform file name, then click Save.
If you switch to the Resource tab of the Design
Browser, you will find out that the test.wvf file
is present in the Waveform folder.
Generating Test Bench
In this paragraph you will
generate test bench files for the synchronous counter created in
the previous steps. You will be using the Test Bench Wizard, the
tool designed to facilitate the process of creating test benches.
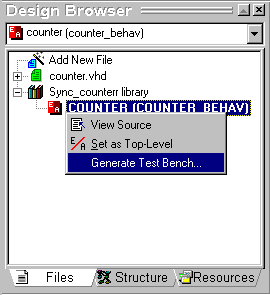
- Switch to the Files
tab of the Design Browser window, and then click
the
 icon to
the left of the design library icon.
icon to
the left of the design library icon.
- Click the
COUNTER(COUNTER_BEHAV) design entity with the right mouse
button, and then choose Generate Test Bench from
the shortcut menu to start the Test Bench Wizard.
- The first Test Bench Wizard
dialog will appear in which you have to choose the
desired test bench type.
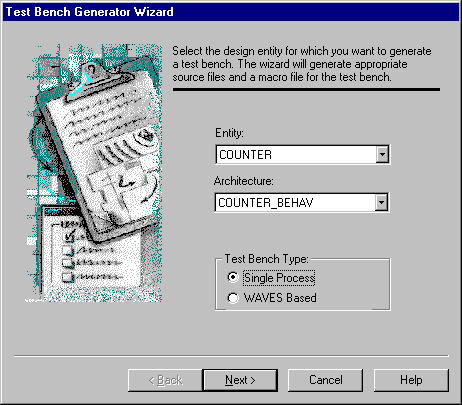
There are two types: Single
Process and WAVES based. Brief description of each type is given
below.
Single Process
The UUT entity must have at least
one input port. The test bench source file contains a process
that produces stimulus driving the inputs of the tested design
unit. The stimulus is produced by a sequence of signal
assignments generated by the wizard on the basis of an already
existing waveform file (the file must contain waveforms
previously created for the UUT entity with Waveform Editor).
WAVES-Based
Test Bench
The WAVES-based test benches are
based on concurrent procedures. One procedure reads an external
test vector file and produces both the input stimulus and output
pattern vectors. The test vector file (*.VEC) is based on a text
format specified by the WAVES standard. Additional procedures
compare output signals of the UUT entity with the pattern
vectors. Discrepancies are reported in a log file. The wizard
generates the test vector file (*.VEC) from a waveform file
(*.WFV) created with Waveform Editor. It also verifies if port
names of the UUT entity agree with the signal names saved in the
waveform file.
In this tutorial you will deal with Single process test benches.
- Select the Single Process
option, and then click Next.
- Select the Test vectors
from file check box, to make the wizard use the
previously saved waveform file to generate the test bench
stimuli. Next, click the Browse button to display
available waveform files. Select the test.wvf
waveform file in the Open dialog, and then click Open.
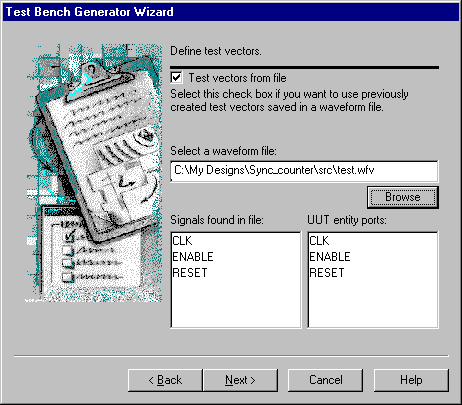
The Ports found in file box
will display input ports found in the specified waveform file,
and the UUT entity ports box will display the input ports
of the COUNTER entity. Note, that the COUNTER entity is the UUT
entity.
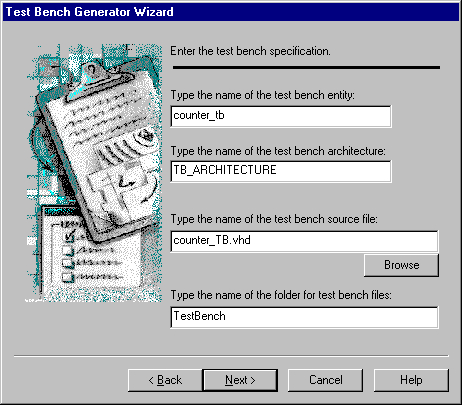
- The next wizard dialog allows
you to specify the names of the test bench entity,
architecture and VHDL source file. The wizard
automatically suggests default names. Click Next
to accept them and go to the next wizard dialog.
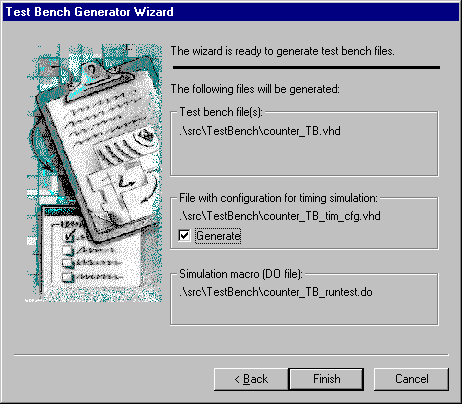
- The last dialog displays the
paths of the files that will be generated by the wizard.
They are:
- the test bench source
file
- a simulation macro file
which automatically compiles the test bench, inserts
the UUT ports into the Waveform Editor window and
runs simulation of the test bench
- an additional source file
containing a configuration declaration for timing
simulation (generated optionally)
Select the Generate
check box to generate the optional configuration file, and
then click Finish.
The wizard will generate the test
bench files and attach them to the design in a special file
folder, TestBench. Note, that Design Browser uses a special icon
for test bench source files to distinguish them from regular
sources. The Counter_TB.vhd file will open in the HDL
Editor window. View the source code to see how the test
bench has been constructed by the wizard.
- Click the
 icon to
the left of the TestBench folder on the Files
tab of the Design Browser. The TestBench
folder contents is as shown in the figure below:
icon to
the left of the TestBench folder on the Files
tab of the Design Browser. The TestBench
folder contents is as shown in the figure below:
Running Test Bench Macro
In the previous paragraph you have
generated the test bench files. One of them is a simulation
macro, which performs the following operations:
- compiles the test bench
- initializes simulation
- adds ports of the UUT entity
to the Waveform Editor window
- runs simulation
All you have to do to run the test
of the design is execute the macro and compare the simulation
results with those obtained in the Functional Simulation
paragraph.
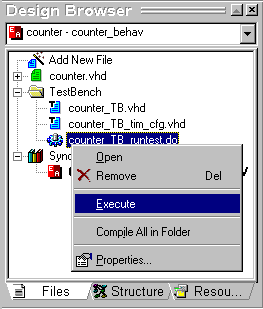
- Select the Counter_TB_runtest.do
macro on the Files tab of the Design
Browser window.
- Click the right mouse button
and choose Execute from the shortcut menu.
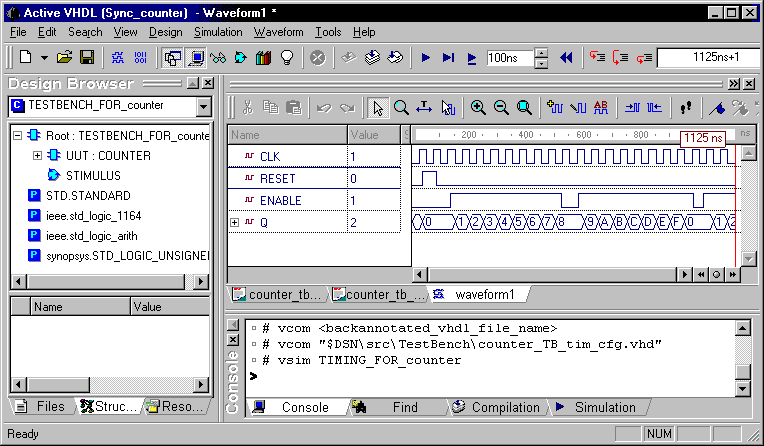
You should obtain waveforms as
shown in the figure below.
- End simulation by choosing End
Simulation from the Simulation menu.
Replacing Design Architecture
One of the key benefits of test
benches is the fact they can be used repeatedly to verify
successive revisions of the same VHDL design.
In this paragraph, you will modify
the Counter design entity by replacing its architecture. After
the modification, the same test bench will be used to verify if
the operation of the counter has not changed. The new
architecture is structural and based on the FDCE_1 component from
the XILINX library (named XU). The architecture is available in
the Synchronous_counter sample design, so you will have to
copy the appropriate source file to your design. To replace the
architecture without modifying the configuration declaration
supplied in the test bench file.
- Switch to the Files
tab of the Design Browser window and double-click
the Add New File icon. Select the Add Existing
File option in the Add New File dialog, and
then click OK.

- When the Add Files to
Design dialog appears, select the Counter2.vhd
file from the src subdirectory of the Synchronous_counter
sample design directory. Make sure that the Make local
copy check box is selected, and then click Add.
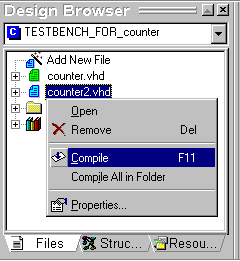
- Select the Counter2.vhd
file on the Files tab, and then choose Compile
from the shortcut menu. Note, that the file contains only
the architecture body (COUNTER_STRUCT) without the
repeated entity declaration. The working library of the
design now contains the COUNTER entity and two
alternative architectures: COUNTER_BEHAV and
COUNTER_STRUCT.
Now, you will have to replace the
COUNTER_BEHAV architecture with the COUNTER_STRUCT architecture
in the TESTBENCH_FOR_counter configuration. As it has been stored
within the counter_TB.vhd file, you have to edit and
recompile the file.
- Double-click the counter_TB.vhd
file in the Design Browser window. This will
open the document for editing.
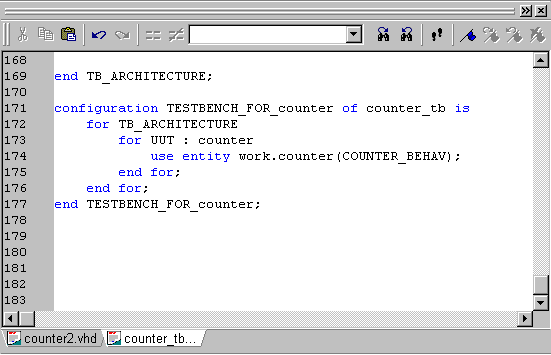
- Find the
TESTBENCH_FOR_counter configuration declaration and
replace the line:
use entity work.counter(COUNTER_BEHAV);
with:
use entity
work.counter(COUNTER_STRUCT);
- Click the Save toolbar
button.
- Double-click the counter_TB_runtest
macro label to open it for editing. Comment out the first
line:
vcom
"$DSN\src\counter.vhd"
This step is
necessary, otherwise the recompilation of the counter.vhd
source file would cause that the entity COUNTER would be
analyzed after the analysis of the COUNTER_STRUCT
architecture.
- Save the macro file.
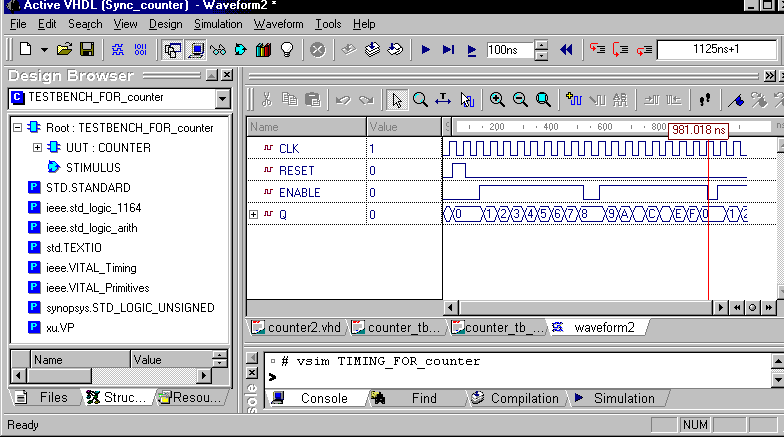
- Click the counter_TB_runtest
macro file with the right mouse button, and then choose Execute
from the shortcut menu.
- Accept the simulator message
when prompted, then view the results. The Active-VHDL
window should look as shown in the figure below.
- Open the test.wfv
waveform file and compare the waveform with the latest
results.
Timing Simulation
The final stage of the design
development process is the verification of the design behavior
after its implementation. The Place & Route implementation
tools produce structural VHDL code being an image of the design
netlist. Such code is usually supplied with SDF files with timing
information. So obtained source file can be verified with the
same test bench that has been used for functional simulation. In
this tutorial, you will not have to run implementation software
by yourself. Instead, you will use implementation files from the
original sample design Synchronous_counter, suitably
modifying them for the needs of timing simulation.
- Select Add Files to Design
from the Design menu. In the Add Files to
Design dialog select the src folder located in
the Synchronous_counter folder, and then select
the following two files:
counter_tim.vhd - the backannotated post place-and-route
VHDL structural code
counter_tim.sdf - SDF (standard delay format) timing file
Make sure that the Make local copy check box is
selected, then click Add.
- Switch to the Files
tab of Design Browser.
Now you will have to edit the counter_TB_tim_cfg.vhd
configuration and the counter_TB_runtest.do macro
so that they can be used for timing simulation.
- Double-click the counter_TB_cfg.vhd
file on the Files tab. The file will open in the
HDL Editor.
Uncomment the line:
use entity
work.ENTITY_NAME (ARCH_NAME);
Replace the
ENTITY_NAME and ARCH_NAME with the entity and
architecture names from the backannotated vhdl file. The
line should read as follows:
use entity
work.COUNTER (STRUCTURE);
- Save the timing configuration
file by clicking the
 toolbar button.
- Double-click the counter_TB_runtest.do
macro on the Files tab. The file will open in the
HDL Editor. Do the editing needed to obtain the following
contents of the macro:
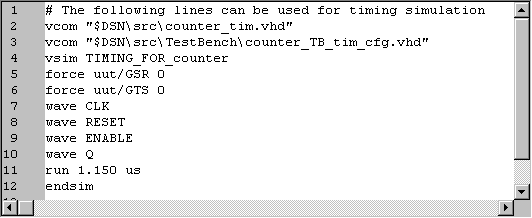
- Save the
counter_TB_runtest.do file. Now, the macro is ready for
execution. The macro will compile the implementation
source files, initialize simulation and run the test
bench.
- Select the macro label on the
Files tab of the Design Browser window.
Click the right mouse button, and then choose Execute
from the shortcut menu.
Wait until the message "Simulation has been
stopped" appears in the Console window.
- View the results of the
timing simulation in the Waveform Editor window
and compare them with the results of the functional
simulation.